Tuesday, November 30, 2010

Hurray for zippered bags!

Today I was delighted to see that the KAL for TECHKnitter's little felted purse had been posted.  Or rather part one is posted. I went searching for superwash yarn that would coordinate with the zippers I had leftover from the KnitPicks Elegant Edibles kit. For the kit bags I bought zippers that matched the yarn used rather than using the standard taupe color that came in the kit.

The zipper is a good bit lighter than this yarn, but it's not
the harsh difference it seems here.
I'm realizing now I have a lot more feltable wool than superwash.  AND when I went searching for my lost Knit Picker I found that I had a whole roll of do it yourself zippers.  Don't remember how many yards are in that, but it seems there are about a dozen zipper pulls that came with it. That zipper tape/coil is beige or cream, so I'm hoping it will coordinate ok enough with a few other yarns that I can go ahead and start another one or two while I'm waiting for the next part of the pattern to be revealed. I have to wonder if some other non-feltable yarn would work out ok for the top instead. I have plenty of cotton and acrylic lately.


I didn't work in the tails yet, because I'd kind of like to see what's coming next first and also be sure that the way I bound off the top edge and the way it's rolling in really is what's intended.


It sure looks like it's sewn on with yarn from the reverse side. But those loops are picked up through the zipper and knitted on from there. As if by magic!

And finally, the squares before the last square (for now)

Darn! I already posted a snapshot of the Blue Chrysanthemum. Surely it's lovely enough to look at twice ;o). Don't remember if I mentioned here or in my notebook that I never imagined working a decrease upside down to make upside down triangles, as the purple ones around the border. (At least that's how I recall it; looking back at notebook it was a 3hdc cluster...) And my crochet experience is fairly limited.

Besides the patchwork (last square) this is another square I'd consider making enough of to make an afghan, or maybe just a lapghan. That I'd consider it at all is very complimentary indeed! (Perhaps the illusion star blanket as well...)


Kinda camouflaged, which had run out of sage green earlier, is done now.  The pattern is a sample block #4 from Melinda Miller's Sensational Sampler Afghan/Lapghan. (Sorry, Ravelry link is the only one I have for that.) Find it on her blog as well. It reminds me of the dip stitch knitting patterns, only in crochet. Makes for a double-sided design, or at least I have trouble telling the front from the back.  Actually, that's a theme for me lately, but understandable considering some of the pieces I was referring to.


Above is sample block #1 from the same Sensational Sampler. It kind of reminds me of atari game backgrounds. I think it would work equally well turned on it's side, too, so it seemed like a good idea to take a second sideways picture of it.

This is the Hugs N Kisses 12" square by Aurora Suominen. I really enjoyed crocheting this, learning the popcorn stitch, back cross stitch, and front post dc and fptc. Those sure add dimension! I don't understand why this photo appears so much closer to the true color in my photo program than when uploaded and viewed in the browser. It is a lovely and sophisticated blue and not the faded dishwater version it appears to be wherever I post it online. 


For that matter, the light blue in the atari blocks (a single square) above is really a dusty/country blue, not a clear and icy cyan. The lighter purple in that square always looks sickly; it's as anti-photogenic as I am!


Oooh - next are the checkerboards, one blue/green and the other berry colored (violets, or technically orchids).


This design works equally well right side up and upside down, or rather the illusion is viewable from both directions. I didn't want to guess or change the pattern and thought it would be easiest to just put a border on it to bring it up to 12" square. I thought the border could be more interesting if it were placed only along two edges, allowing for a wider border. I did miscalculate and picked up as many stitches as rows when picking up stitches to make the green square in the corner. 


The pattern, Checkerboard Illusion Tutorial by Susan Mrenna, works just fine, but if I were to do it again, I think I would enlarge the design. It seems it would be amazing with bigger squares. Actually her pattern is exceptionally well written and thoroughly enjoyable to follow, not just telling you what to do, but why and pointing out how and when you can first really see the illusion.  I do not mean to sound unenthusiastic about it. I think it's the nature of squares. They are not the most dynamic of shapes, compared to say stars or tulips. I should have recalculated it to make bigger squares in the checkerboard. In the 8" square that the pattern makes the checks seem appropriately sized.


And so the berry colored version, right side up and upside down:


 With this square I crocheted the border, mostly for expediency. Crochet is just so much faster under many circumstances. Hmmm, only now realizing up til these all the squares on this page were crocheted!

Two Tulips, II

And one of the earliest finished is the last to be shared - Two Tulips, II


That's the left two tulips from the Illusion Tulips Pattern by MuseSusan. I took a few rows out of the chart at the bottom and also at the top of the stems so that the finished square would measure 12". Had to reshape the top tips of the leaves just a bit. Didn't realize until I got to that point that because the stem of the left tulip really leaned if I just cut out those last rows of stem the stem on my square wasn't going to connect with the blossom. So a tiny bit more tweaking there. And like the rest of the illusion patterns, the image is visible looking from the top to the bottom.

This was before blocking and in indoor light, and probably well after dark, too. This one was finished at least a week ago, but I only just mailed it in a box today, along with about twice as many as I'd sent before. I really should have split that up and sent the tulips and stars on in advance. Guess I just kept thinking I was almost done with the next square, so it could wait another day. I've enjoyed making squares so much I may move on to making 8" squares to send to South Africa. But that will be after my holiday crafting, and maybe after making some progress (but not necessarily finishing) on projects just for me.

In other news I did have a lot of inspiration for squares left over. I've just run out of time to put off my holiday crafting. One of the things I wanted to do was make a square with a happy family on it. This was something I thought of after seeing decals of stick figure families on the back of the umpteenth minivan. I decided I'd really like the people in my square family to be holding hands, and instead of knitting them on I thought it would be really nice if those were three-dimensional and even interactive. Maybe more on this another time.

Well, since the other version got it's own post

Oh, my!  It seems I may have left this post in draft mode for a while, thinking I'd finalized and published it.  Poor slightly less loved blue version. You are lovely in your own way. I really didn't mean to get quite so wrapped up in version two so as to forget you and treat you in a shabby way.

This is actually the first square I made from SmoothFox's Diagonal Box Stitch Square 6x6. I thought it might be interesting to make 4 and sew them together in a decorative way. I misread the pattern the first time and only made the center stripe of color 3 rows wide, rather than 5. They still matched up nicely in the end. And the big diamond shape is at an oblique angle. I didn't realize how difficult the squares would be to sew together neatly. There isn't a way I can think of to create a selvedge using this construction. But that is what inspired me to redo the pattern, making a diamond design in a one piece 12" square.

Eeek! I feel so terribly redundant. I suppose it's like books that are written in a series, but you can pick up anywhere and not really be lost because even the central characters are introduced in each book. Well, that's the nicest way I can think of relating to what's going on from one post to the next and also the notes in my Ravelry notebook. It makes me feel boring that I don't have any more to say or more stories to tell.

But wait - I do have pictures!


I like this best when the navy diamonds are on the right and left, rather than up and down. I suppose since navy makes up just two sides of each outline they're not diamonds. Perhaps they are chevrons?

Like the other square based on this pattern I find it hard to be sure which edge goes up and which side is front. So here is what I decided was the wrong side at photographing time, and it's turned 90 degrees each time to show most or all edges could be up.

This is the "wrong" side:

Monday, November 29, 2010

I'd decided against this, then changed my mind: Part 2

Now it's two posts ago that I typed the following and then changed my mind:
I'm thinking there's probably no reason to devote time to words and photos explaining how I cheated the yarns into place. They only needed to be moved from a connected corner either right to the next corner or up to the next corner. Moving right was super easy and I got in the habit of pulling the last yo back out of the last dc made and completing that yo with the new color. It drapes a short strand of yarn across the chain 3 space that you'll be crocheting into. So the 3 dc that go into that chain 3 space will cover it up nicely.

This will be the short post, ha ha! Or not, I thought this was the more intuitive of the two cheats anyway. The big picture: I'm making something like the blue diagonals square, which is four 6"x6" squares sewn together, but crocheting the 12"x12" in one piece. I'm using SmoothFox's Diagonal Box Stitch Square 6x6. It's not designed to be used this way, but I was determined to tweak it into what I wanted. When the diagonal stripes need to go in a different direction the color strands needed are not quite where they need to be, but close.


I need the yellow and white yarn to move to the right corner of the green square so that it's at the corner to the left of my hook. We'll just drape that yarn across the top of the green square between my just finished green square and the place where the yellow/white yarn is coming from.


To start with, I like to pull the final yo of the last dc out and put the two loops it was pulled through back onto the hook. (That's just a method for changing color so the first stitch in the new color isn't wearing the old color for a hat; the last loop the yarn is pulled through will be the one on top so it might as well be the new color.) You can see the final stitch is shorter because now it's missing that last yo and draw through.


It took me a few tries to figure this out, but I also like to have the old color strand (green here) in front of the work before catching the yellow/white yarn (new color)


and pulling it through the two green loops to (again) finish the last dc of the green square on the right.


The yellow strand in front is across the top of the green block from the last row and the strand further back goes to the skein of yellow/white yarn.

And I've draped the green across the yellow strands.  (That's to catch it in the slip stitch coming up; otherwise it will hang from the middle of the green block and on the wrong side when you next need it.  This will put it in the corner at least, where it would have been.)


Guide the hook under the chain 3 at the top of the left green square, which is taking the hook over/in front of the green strand and under the yellow strand that sits along to top of the green square.  Grab the yellow strand in back that leads to the skein


and pull a loop through the chain 3 space


then pull the new loop through the other yellow loop, making a slip stitch that connects the corners of the two green squares.


Begin square as in pattern. Here I've already made the first 3 chains, and am making the dc next to those.  The dcs are made through the chain 3 space of the green square and the yellow strand we pulled across the top of that will be trapped in the bottom of the dcs.


1 dc is made and you can see where both the green chain 3 and the yellow strand pulled across it are being covered.

That yellow strand pulled across (many steps back) just needed to be long enough to reach across the green square. No extra slack was needed.


Again, this may be completely obvious to anyone who does any amount of crocheting.  It took me some tinkering to figure out because the pattern I was using was designed to make diagonal stripes in one direction.  When I got to places where I needed to change direction of the colors to make a diamond I had to improvise and play a bit. If nothing else, when I make this again I'll have step by step notes about exactly how I did it! Hurray for that!

I'd decided against this, then changed my mind: Part 1

In the last post I initially typed the following:
I'm thinking there's probably no reason to devote time to words and photos explaining how I cheated the yarns into place. They only needed to be moved from a connected corner either right to the next corner or up to the next corner. Moving right was super easy and I got in the habit of pulling the last yo back out of the last dc made and completing that yo with the new color. It drapes a short strand of yarn across the chain 3 space that you'll be crocheting into. So the 3 dc that go into that chain 3 space will cover it up nicely.
Moving the yarn up: first I tried catching the strand in the last dc on the left of the square before (moving diagonally; the rows march diagonally, up and left each block to make a row). Just put the strand over or under the working yarn before pulling a yo through to make the dc. (This does leave little contrasting dashes, but they're next to the color they belong with.) Then I finally got the bright idea to borrow from the original pattern. I started using slip stitches. When the color needed to move up to the next corner it would have been going from the lower right corner of a square in the previous row to the upper right corner of the same square. The loose strand was just waiting there in the lower corner. So I started making a loop through the top of the lowest stitch in the square and then making slip stitches up the top of the stitches next to it.

And then by the time I got to here I realized that many words about crochet without pictures to back it up is a disaster. Fortunately I took pictures while cheating the colors into place. Uncertain as to the quality, but here goes! Well, backing up a minute. Overall I'm making something like the blue diagonals square, which is four 6"x6" squares sewn together, but crocheting the 12"x12" in one piece. I'm using SmoothFox's Diagonal Box Stitch Square 6x6. It's not designed to be use this way, but I was determined to tweak it into what I wanted. When the diagonal stripes need to go in a different direction the color strands needed are not quite where they need to be, but close.


I need to work a square above the blue/yellow one to the left of my hook.  But the strand is at the bottom corner of that square and I need it at the top corner, next to the hook.


I take the hook and put it through the top of the bottom most stitch in the blue/yellow square, drawing the strand that's there through the top of the stitch to make a loop. 


Leave that loop on the hook for now. Draw a loop through the top of the next stitch and pull it through the first loop.  That's making slip stitches to bring the yarn up to where it needs to be.


Two slip stitches made, one in each of lowest two stitches in blue/yellow block. (The stitches in the previous row of blocks face sideways because the pattern gets flipped over and worked back once you get to the edge.)


Next the blue loop is going to need to be where the yellow white one is. It's replacing the last yo and draw through in the last dc in the yellow white block. That follows the theory that when you want to change colors you change in the last yo of the stitch before (or else the next stitch you make is wearing a hat that doesn't match).


So carefully pull the yellow/white loop out, put the two loops it held on the hook, put the hook through the blue loop


and pull the blue loop through the yellow/white ones, again completing the 3rd dc in the yellow/white block.

Start the blue/yellow block just the way the pattern says, beginning with a slip stitch into the 3 chain space. My thinking is by finishing the last stitch of the previous block with the new color the old color doesn't reach into the new color. 

Earlier on I was disguising the color by winding it through the strands in the last dc of the color block before it's needed.  That would have been taking the blue and draping it over or under the yellow/white yarn before each yo and draw through in the yellow/white dc. But that does leave little strands of blue visible.

I'm not the best explainer, but these notes will help me to recreate it the next time I work this pattern this way.  It's written to just have the colors going in one diagonal direction.  Doing that doesn't require the threads to be moved to the next open corner.  I just wanted the effect of having sewn 4 small squares together without having to do it.  The construction of the diagonal box pattern doesn't really leave good edge stitches or any selvedge for nicely sewing through. Then there's the reality that I don't know crocheting nearly as well as knitting. Could be this is very very basic crochet technique that I just never learned.

The last square, for now

I had to put it in a slideshow.  I can't seem to make up my mind about which edge goes up.  I'm pretty sure this first set shows which side is front.


And this side is the back, but it seems to look nearly as nice.


I'm a big fan of the wrong side, too. This is a jumbo square (12" x 12") that I made using SmoothFox's Diagonal Box Stitch Square 6x6 pattern. I'm guessing that may be clear from other posts, but I'm going back to dot (i)s and cross (t)s.

Saturday, November 27, 2010

Sure, it's an ungodly mess NOW

But I think it's going to be pretty wonderful soon!

After spending a good bit of time and making painfully slow progress sewing together four 6" x 6" square blocks (including the following three)


to make the 12" square at right, I really wanted to explore making an entire 12" square as one piece. Certainly that could be done, but I wanted to use colors to arrange a central diamond motif at the same time. I used SmothFox's Diagonal Box Stitch Square 6x6 for the pattern for the 6" x 6" squares, which makes stripes as parallel diagonals. I was sure I could modify that to make the diagonal stripes align as if they were four small squares sewn together. It just took a bit of tweaking and playing and cheating.

SOooooooo...
There's just a bit of spaghetti involved. But you can see at the top left and bottom right that I'm just starting to get diagonal stripes at a right angle to what's in the bottom left corner.


I think it's off to a nice start anyway...  I may wish I'd chosen different colors. Won't be the first time.  Just too tired to go on right now, so it's going to have to keep until tomorrow. Will try to take some snapshots of cheating the colors into the right place from not too far away. Sometime soon when I have more time to talk about knitting (and to a much lesser extent, crocheting - although that has suddenly become a bit more interesting with the new techniques and texture stitches I've learned lately) instead of actually knitting. Good night!


Monday, November 22, 2010

Big Ooops! Never posted the finished stars squares here

I don't know how it took me so long to notice that the completed stars squares weren't posted.  Except that as I mentioned earlier this evening that I was focusing on the actual knitting and then crocheting and planned to catch up on the yakking about it later or whenever.

Squares are for the Spreading Love project. The goal is to make comforting blankets for an ill child and her two siblings.


Here's proof of distraction or something. I didn't notice until much later that I consistently was photographing this square upside down. I suppose that's good proof that the illusion works in both directions, though.  Yippee!!!

I really should take some nicer finished photos of these, but they aren't pinned down any more. I tend to run out of blocking pins. Should put them in my wishlist while I'm thinking of it.

Squares in Progress


Ran out of sage for the square directly above.

I'm not showing the tulips one that's in progress because I can't get the color to photograph well at all.  I thought it was about a third complete, but looking at it again that may be closer to only one quarter.  I think it's going to turn out beautifully.

ETA: These squares are from Melinda Miller's Sensational Sampler Lapghan/Afghan, squares #1 and #4 Scroll down and look to the right.

More Completed Squares

I've been putting off adding information about more Spreading Love squares because I've been trying to maximize my square making time. I figured I could just mention the progress here when I got around to it. But I find myself suddenly taking a break from square making. My right hand was complaining a bit earlier. I've been crocheting and if I dive right into that suddenly and intensely my right hand is always going to complain a bit. I already can't remember just what it was that was uncomfortable, so that's a good sign already. I know in the past I've related the difference when switching from knit to crochet to having to turn my right hand about a quarter turn more when crocheting to grab the yarn with the hook.

I crocheted a few blocks after finding the Sensational Sampler Afghan/Lapghan pattern. (Ran out of yarn in one block and was discouraged by my color choices in another, so this the only completed one from that source at this time.) Free download on Ravelry; sorry, I don't know where to find it elsewhere. I also seemed to remember that when making the colored part of my Hounds4Homes afghan granny squares I finished at least 4 squares in the same day. Knitting the recent squares seems to take me more than one day. The knit squares probably are a bit larger than those I remembered crocheting for the afghan. They might take less than 24 hours; it's hard to tell because I often finish things up in the early morning hours when it's the next calendar day already.  Above is square 6 from the sampler.  I finished it by continuing the pattern around all four sides, three rounds worth and varied the stitches in the middle round to try to get the final edge straight and the corners pointy.

And this is clearly too much typing.  I'm starting to feel that now, too.  So, bring on the promised photos!

Blue Chrysanthemum

At left is the most recently finished square.  I used the pattern Kata by Penny Davidson.  Thanks for the pattern, Penny! I really enjoyed crocheting this and briefly had the impulse to make many more squares later and create an entire afghan out of them.  I probably won't, but it says something very nice about the pattern and how well I think it turned out that I'd even momentarily consider doing that.

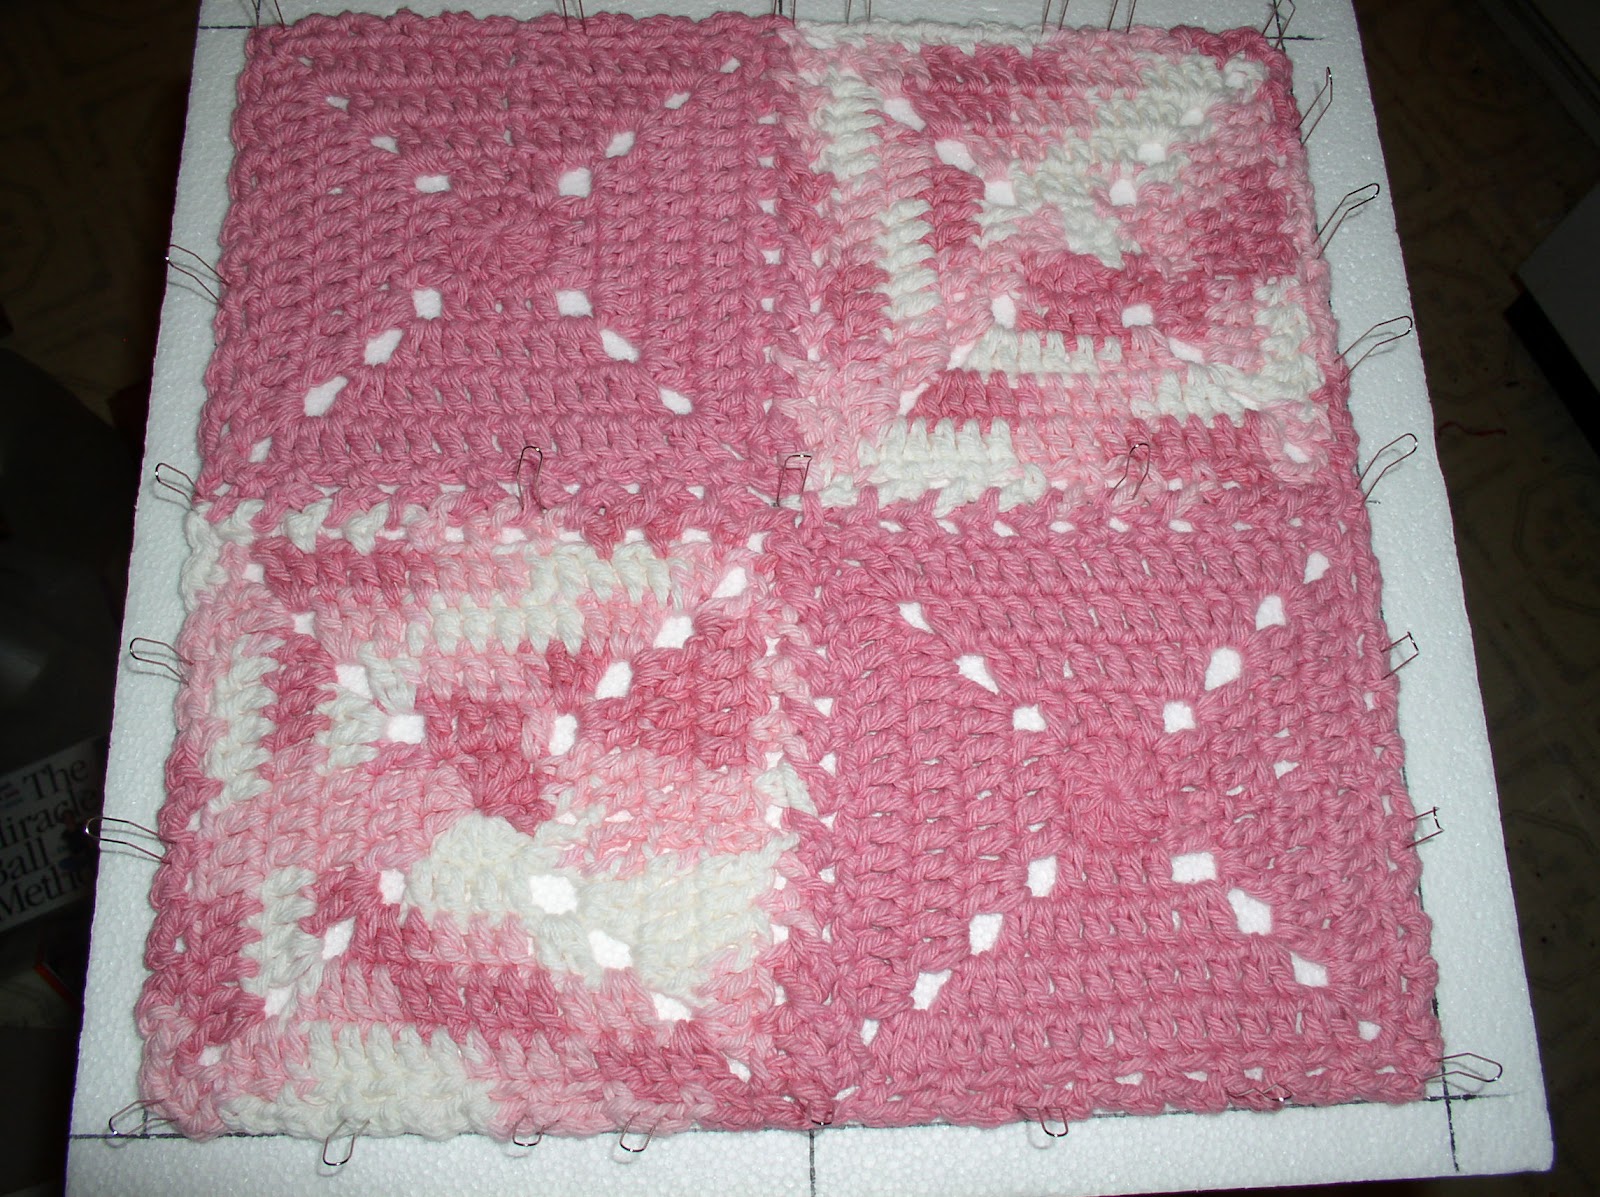
Pink Squares Braided

To the right is a square made from 4 mini granny squares that are joined with an easy flat braiding technique.  Priscilla Hewitt explains the technique in this photo tutorial. It took forever for the images to load the first time.  Otherwise, I had not trouble with the instructions or with easily following them.


Vroom, Vroom; Beep Beep!


I thought the tulip square was the one that I'd started a long post about and left in draft form. Nope, it was the Janus cars instead. And most of that was about finding and fixing a mistake. Also I explained how I reversed the direction of the second car. From there I go on to expound on the benefits of working illusion patterns in two opposite methods.  It got out of hand and was too long and was going to require an additional post explaining a detailed part of that.  So I just abandoned it temporarily to get back to the knitting.  I don't mind typing about knitting, but not at the expense of actually knitting.  Especially when the work is time sensitive. Here's the scarf pattern I was following for the car illusion.


Finally

Not more stars, but tulips!


Ta- Da!  I liked this pattern so much I started it a second time.  It is the Illusion Tulips pattern by MuseSusan at DeviantArt.  Well it's nearly that anyway; I think the designer will still recognize the finished product.  I took a few rows off the bottom of the chart and out of the middle where the stems attach to the blossoms AND only used the first 50 stitches from right to left. This was to make the image fit into a 12" square. In the second one I'm using the left most 50 stitches, so it shows the two left most tulips (out of three total). I'm using lighter and brighter colors in the second try.

Tuesday, November 16, 2010

More stars, the third time

I'm very happy with how this square for Spreading Love for Marie is turning out so far.  Only about 1.5" left to go before binding off and crocheting the edges.  I switched to size 5 needles, down from size 6 on the second stars block and size 7 on the first one.  They seem to be working out well and the width is about 11.25 - 11.5", which leaves about the right amount of room to single crochet all the way around and finish off nicely with all edges matching.

For this square I started with stitch # 30 from the right edge.  I drew lines on my printed chart to try and prevent me from starting in the wrong place or just reverting to stitch #1 at the beginning of a row.  I did try to do that second thing a few times anyway ;o).  I placed markers where the pattern indicates and also one after the far left edge of the chart to know everything afterward is the stitches that were skipped at the beginning of the row (stitches 1-29 in order from right to left).  The goal was to put the large star on the right side of the small star.  I guess so there'd be something different about the second and third version, besides the colors.  In the second one the two ombre colorways were fabulous together.  With the third, I didn't realize that I was choosing skeins that both faded to nearly white. It seems that would be ok for either the star portion or the background, but not both.  (I think it would be even better if the fade to white was only in the stars color and not in the background.)  The white from each strand would often line up too closely together.  So I added in a plain yellow and a different yellow ombre yarn, too.  Actually, one was the yellow and peach used in the version two.  I briefly used some of the seafoam -oops! that's seaspray- yarn that was used in the first star square and also in the diamond brocade block.  When the original background yarn got to the bluish color I added the seafoam strand at the opposite side and worked a few of the background rows in that before switching back.  I'll have a lot more ends to weave in at the end, but I think using the extra yarns was the right choice here.


At the right the square is shown upside down, with the large star on the left just like version 2.  It looks very different because turning it around doesn't change the way the stars are slanting.  I suppose I've changed it since the first version because I can, I thought to do so, and I like to think I'm improving on something each time.  I didn't want to settle for as many partial stars as I got in the first square when I could change the starting point to shift it all and have more stars and less star pieces.  I'm sure it's just me though ;o).  I hadn't thought about flipping the chart upside down and working it that way.  That doesn't seem like a meaningful change would result, though.

Sunday, November 14, 2010

Another square, and only a minor miscalculation

Finished the second stars square this evening.  Squares are for the Spreading Love project.


Progress was going pretty fast, comparatively.  AND, a bonus, I am not making the errors that I was in the first version of this.  I am following with chart and maintaining the "sanity markers" along my needle, adding a 3rd marker that shows where the right side of the chart ends so I know I'm wrapping around to the first 9 sts on the left.


I thought for this one I'd shift the starting point in the stitches and rows so that more complete stars would show up in the final square.  I started on the *10th st in from the right edge* and on row 24 and planned to complete through row 118.  The first star square was 94 rows high.  Using two "ombre" yarns provides plenty of variation in colors and shading with far less loose ends to weave in.


At row 118, with about an inch left to work, I realized I was looking at the wrong numbers on my sheet when I started.  I began with row 24, but had actually planned to start with row 48 and continue through row 142.  Seemed I'd be at 12" around row 128.  So I kept working until I had points on the two mostly whole stars, around row 136.   Then I unraveled up to row 42.  Used a size G crochet hook to draw loops through the active knit stitches and bind off, making slip stitches.


Even after switching to size 6 needles from size 7, with a 54 stitch wide pattern I'm still a little too close to exactly 12" wide to finish off with a nice edge the way I'd like.  Perhaps next time I'll drop down to a size 5...although 5s are notoriously bad luck for me.  The only needles I've broken, three or four total, were all size 5.


*Nov 16, 2010 @ 2:42 AM ET - Edited above to fix the starting point info.  Made the same mistakes here as I did in my Ravelry notes.  I only partly understand why.  I was skipping the first 9 stitches which leaves 9 stitches to work before the sanity marker.  So instead of being clear and saying I started with stitch 10 instead of stitch 1, I guess I had 9 on the brain and kept saying I started 9 sts in, which is sloppy, vague and just wrong, really.  Otherwise, I misidentified the direction from which I was starting.  Clearly typical charts read right to left; I know this, and this is how I was using the chart, too.  Still I said 9 (wrong as just noted) sts in from the left edge.

Saturday, November 13, 2010

Completed squares


I think this would definitely make a neat blanket as an all over pattern.  That's the way the actual blanket pattern I was referring to is written.  (For the Spreading Love project I just needed a single panel width worked up into a square.)  I can imagine children tucked in with this blanket and gazing down at it, seeing all the stars popping out.  Perhaps that makes it too interesting to promote relaxation, though.  This won't the the last illusion knitting project I do.  Well, I suppose that's a silly thing to say since I already have a second version of this on my needles and half completed already!

Here are the other completed blocks:

Sure wish I could master altering the layout here...just seems a bit clunky and very limited.  oh well!


To the left is Holding hands, feeding ducks.

If I were doing this brioche pattern again and altering it into a square shape, I might be more particular about the corner that doesn't really have any yellow in it.  That just stands out just a bit.  I also might try to establish the corner/squared shape much earlier in the design.


Here's the M block, just needs blocking.


ETA: the blocked version - what a difference!!!


and also edited to clarify a poorly expressed thought and provide the link for the Star Illusion Blanket pattern.