Showing posts with label knitting. Show all posts
Showing posts with label knitting. Show all posts
Wednesday, April 20, 2011
Wednesday, March 16, 2011
Intarsia in the round face
 |
| Pixie Hound |
  |
| http://www.llamalove.com/catalog/escalade08.htm |
 |
| http://www.oakrestllamas.com/femalesforsale.html |
 |
| http://www.minnesotaminis.com/lcp/?cat=9 |

Next I'm focusing on the colors on the face. It's a bit hard to tell, but I plan that the dark brown areas will be under the eyes. I'm crossing my fingers that it's going to work out okay. It is intarsia in the round using a technique I learned from the Inside Intarsia with Anne Berk dvd.
Thursday, March 10, 2011
Four at a time llama llama legs
|
| French Silk, aka Frenchy. This first llama was crocheted. |
Techknitter's disappearing loop cast on was essential as I never had a method for knitting a circle from the inside out before. That was one of the easy things to do in crochet that I wasn't sure I'd be able to do knitting. The second obstacle was figuring out how to knit a loop stitch. Actually, I found a few methods and all of them required me to turn the work when I got to loops rows just like crochet does. The technique I adopted was to draw a loop over my left index finger and then pull both of the loop strands through the stitch still on my left needle. (I knit continental.) Then I move the 2 strand loop from the right needle to the left needle and knit through the back loop the 2 new loops along with the one from the previous row that was still waiting on the left needle. I saw a method demonstrated on YouTube that uses American/English style, but I really don't want to convert to a method I find clunky and labor intensive. Not when I can hold the yarn in my left hand as if I was crocheting and have my left hand take up some of the work by pivoting back and forth. Seems there are a few variations which instruct one to alternate loop stitches rather than loop rows. I'm finding that loop and regular knit rows alternated seems to produce a greater row height than plain knit rows alone. Since I have many rows to alternate I'm just going to keep going and when I've knit more than an inch high I'll measure it and decide how to adjust the number of rows to knit.

What makes knitting so completely superior to crochet?
The ability to work multiple items at the same time on the same needles is the best reason I can give. I'd started each of the feet individually and then worked them up to equal points and put them all on two circular needles. The same method that Cat Bordhi introduces in Socks Soar on Circular Needles can be used to knit a single cylindrical type item in the round, but you also can continue to add extra work (I only do copies of the same item and line them up in the same place to avoid confusion) as long as you have a free end of yarn to knit with.
For socks, I wind up about half a hank of yarn into a center pull ball, then take if off the ball winder and set it into the middle of the box of my Tilta Swift. I'll take the remainder of the hank off, turn it inside out so the inside end is on the outside, then using that end wind up a second center pull ball leaving the yarn that connects the two uncut. I usually drop these siamese twins into a small yarn sack and work from each end at the same time. It can be a bit funky casting on for two at a time. I really can't explain just how I do it myself even. Sometimes are clunkier than others. But with this method I can be assured that my socks really are twins. There are times (might not happen now) when I've had to make a decision about something and not been certain of exactly how I interpreted an instruction or improvised to be able to do the same thing again in a second sock. Finally, I really don't have the correct personality for doing the same thing two or four different times if I can make two or four versions at the same time. The only trick then, and you learn it fairly fast, is to make sure you are using the correct yarn end for each sock or item. Each one needs it's own end of yarn. This is a trick I use when I'm not sure I'm going to have enough yarn, like in the llama feet, but I want to use up as much as I can of the first color or want to be certain that the second color will start in exactly the same place on multiple items. (The llama legs don't start with a different color in the same place because I decided synchronized color changes was not a requirement for this project.)
With socks you will need to work one heel at a time at the part of the pattern where your rounds turn into rows. It's such a short amount of the whole that even I can manage it. The only other difficulty is when you are working patterns with decreases. The order for your work is to knit side A of sock 1 then side A of sock 2 then side B of sock 2 and side B of sock 1. You may find that you need to k2tog with one stitch on one circular needle and one on the other AND there is no way to reach it yet. If it's on the right end in the right direction (will usually be the second sock or the one that's on your left at the start of each new round) you just slip the stitch from one needle to the other. But if it's the last stitch on the first needle for the first sock you won't get to the second k2tog stitch until you've completed the second half of the second sock. But this is easy to work around by slipping the first k2tog stitch off onto a removable marker or suitable safety pin and then sliding the marker onto the second needle where the second stitch for the k2tog lives.

I realize this would be better with more pictures to tell the story, but really, I'm not feeling up to illustrating all of it with examples. And there's probably information about this in other places that truly are more like resources anyway. I always look to Techknitter first when I have any question or challenge. She is amazing. Maybe later I'll mention how I kitchener stitched the first leg back together using her knitting needle (not tapestry needle) method. Or I'll just link it now because I'm feeling lazy - no efficient. Efficiency rules.
Friday, March 4, 2011
Well this has taken far too long
I've been away much longer than I expected. Not in body so much as in mind. I'd just been detoured onto omgpop via yahoo and playing way too much Draw My Thing. It was such great fun for quite a while. And then I found myself tangled up in a rift between two other players, which has tarnished the experience quite a bit for me. I think it will be fun again, but in the mean time I'm limiting my time there and focusing my attention and energy on other fun things that I had been neglecting.
Had I not been distracted I probably would have the second llama finished already. I am knitting a crochet pattern. I checked the gauge and am hoping now that I made a note of that in Ravelry so I can be sure what my numbers are. I do have the recollection that I need 2 more knit rows to equal the same height of crochet rows.

My progress so far is a barely started body, three feet and a leg that could be in the half done range. Had a terrible time getting a decent photo of the three feet. I was working each on double points until I got to 42 sts in the round and started knitting the first 2 together on a set of two circulars. Realizing I was running low on the dark brown for feet I clipped on strand and started the third foot, knit until I ran out of color and then switched to white. Ultimately all where switched to white and when the progress on the third foot had caught up to the first two I put it on the circulars as well.
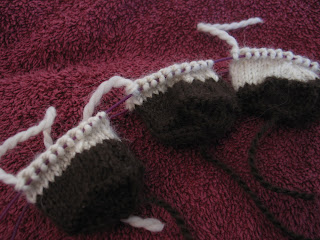
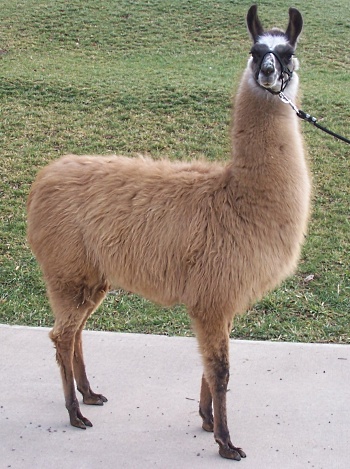
I reviewed as many llama photos as I could, paying particular attention to the feet, and concluded that often their feet do not all match. So my second llama will look like it's wearing spats that are uneven. I don't even know what I will do for the third llama yet, but I have llama yarn for it, possibly even a fourth.
After photographing the feet and leg I noticed a mini-skein of what I think is Malabrigo sock that was sent to me as a sample when I ordered other yarn. I hope at some time I'll verify where it came from, but I suppose it isn't absolutely necessary. I am pretty sure of what it is just from memory, but not the colorway. I kind of hope there is enough there to make a sock for my sister's sock monster. Otherwise, I am not sure just what I'd do with a very small amount of sock yarn.
Had I not been distracted I probably would have the second llama finished already. I am knitting a crochet pattern. I checked the gauge and am hoping now that I made a note of that in Ravelry so I can be sure what my numbers are. I do have the recollection that I need 2 more knit rows to equal the same height of crochet rows.

My progress so far is a barely started body, three feet and a leg that could be in the half done range. Had a terrible time getting a decent photo of the three feet. I was working each on double points until I got to 42 sts in the round and started knitting the first 2 together on a set of two circulars. Realizing I was running low on the dark brown for feet I clipped on strand and started the third foot, knit until I ran out of color and then switched to white. Ultimately all where switched to white and when the progress on the third foot had caught up to the first two I put it on the circulars as well.

I reviewed as many llama photos as I could, paying particular attention to the feet, and concluded that often their feet do not all match. So my second llama will look like it's wearing spats that are uneven. I don't even know what I will do for the third llama yet, but I have llama yarn for it, possibly even a fourth.
 |
| It's prettier in person ;o) |
Thursday, January 20, 2011
Knit a llama llama, a drama llama
I've started a knit version of Coquena the llama and am using llama yarn, of course, progress toward an eventual fiber menagerie. I measured my crochet gauge, which was 7 stitches and 7 rows to the inch. Then I knit the foot after finding TechKnitter's Disappearing loop method of casting on in the middle. It is an excellent method. To avoid the time and effort knitting a gauge piece for gauge's sake and knitting it in the round I just planned to measure the gauge in the column of the lower leg. Turns out that using the same mm needle as the size crochet hook I'd used (and same yarn, but different color) also yielded 7 sts to the inch, but 9 rows to the inch instead of 7. To compensate for this I added 2 rows for each 7 rows which made the row count for the lower leg 22 instead of 17. (14 + 2 + 2 + 3 + 1; 2 for each block of 7 rows, 3 rows to finish off the original 17 in the pattern, plus one additional row because 3 is nearly half of 7 and I add 2 with every 7. I'm sure I have not accounted for that in a very clear way, but that's all that comes to mind in way of explanation at this time.)
Didn't notice this llama already named French Silk before I named my crocheted version. I based her color pattern on this llama with a painted coat. And then when the yarn arrived the combination reminded me of the chocolate pie with that name.
Unless I change my mind I'm planning to pattern the colors on the knit llama mostly after one called Macarena. She and a few others I saw in photos have very dramatic white faces with black eye patches and rust colored bodies. It's a very dramatic look I just have to attempt.
Poor French Silk, my unfinished crocheted llama llama. She's in pieces.All Nearly all of her pieces are completed, but sewing together is often a place where I cast on something new instead.
I'm really excited about knitting a llama llama. I'd much rather knit anyway, and crochet, especially crocheting stuffed toy tight, is very hard on my hands. Also, whenever there are duplicate pieces to work I knit them simultaneously using a pair of circular needles. I cannot crochet two pieces of anything at the same time. It worries me that the duplicates might not match exactly and it just seems slower to do them one at a time. Since this is a stuffed animal and not a garment I am very hopeful that the knit version will be simple to engineer and will very closely resemble the crochet original, only smaller, probably. I am a little concerned about the way that single crochet produces a much denser fabric than knitting. I don't think I'll be able to stuff a knit version nearly so tightly as a crocheted one.
Crossing my fingers! Well, figuratively crossing them; they're actually busy knitting or typing about the knitting. Honestly, I kind of like the white ring around the ankle on the knit leg. What I was doing was putting in two knit rows with "waste yarn" to make it easy to remove the unaltered foot (without extra rows to compensate for the comparative shortness of knit stitches) and replace it with one reworked to a taller proportion. I'm kind of leaning toward not only leaving the white ring, but making all the other feet to match this one. It's a decision I'm going to postpone for a bit. I have not yet mastered or even attempted a knitted loop stitch. There's a pattern for it in a book I have. Besides that, the only other concern I had about knit construction was with starting in the middle of a tight circle. Presto! TechKnitter's disappearing loop method pops up. Thanks so much TK!
 |
| Poor Frenchy, assembling her for a pic I see one arm is incomplete and the other not stuffed! |
Unless I change my mind I'm planning to pattern the colors on the knit llama mostly after one called Macarena. She and a few others I saw in photos have very dramatic white faces with black eye patches and rust colored bodies. It's a very dramatic look I just have to attempt.
Poor French Silk, my unfinished crocheted llama llama. She's in pieces.
 |
| Drama llama's leg is definitely coming out smaller so far. |
Crossing my fingers! Well, figuratively crossing them; they're actually busy knitting or typing about the knitting. Honestly, I kind of like the white ring around the ankle on the knit leg. What I was doing was putting in two knit rows with "waste yarn" to make it easy to remove the unaltered foot (without extra rows to compensate for the comparative shortness of knit stitches) and replace it with one reworked to a taller proportion. I'm kind of leaning toward not only leaving the white ring, but making all the other feet to match this one. It's a decision I'm going to postpone for a bit. I have not yet mastered or even attempted a knitted loop stitch. There's a pattern for it in a book I have. Besides that, the only other concern I had about knit construction was with starting in the middle of a tight circle. Presto! TechKnitter's disappearing loop method pops up. Thanks so much TK!
Saturday, December 18, 2010
Better photos of zippered bags
Forgot I'd taken these. Been distracted a bit lately.


It recently came to my attention that even the smaller bag, which I thought I'd made according to the pattern proportions and stitch count, is actually over-sized on it's own. Pffft - sometimes these things happen.
I'm totally loving that my sister's old camera enabled me to make a video clip of the unacceptable zipper noise and performance. It's so great when I can offer proof that it's not just me!
Tuesday, December 14, 2010
Caveat Zipper
Zip and unZip your zipper before knitting it into the bag,
even if it's a new zipper! Perhaps you want to open the package in the store and check it before you bring it home...
The zipper in my larger little felted purse is a big disappointment and a chore to operate. While the zipper in the smaller bag glides back and forth easily with a high pitched zzeeeeppppp!, the zipper in the larger bag is sluggish and loud and difficult. I don't understand why. It's a brand new zipper that I bought at the in a group of maybe 7 new zippers, to match some non-felting yarn I had on hand in anticipation of making several zippered bags. New Coats and Clark nylon coil zippers. It has no business sounding like a belligerent, big metal-toothed zipper, sticking and rusted on a neglected sleeping bag or large utility object.
 I didn't notice the difficulty with the dark green zipper until I had knit it in and was nearly half finished with the bag. At that point I thought I'd just have to pick up some wax or other such zipper fixing aid and deal with it later. When I checked at JoAnn's the only thing they could offer was beeswax in a plastic case with slits on both ends. I pointed out that it was labeled with instructions for waxing thread. But the sales associate insisted the slits were also fine for sliding zipper teeth through.
I tried applying the wax to the teeth of the zipper multiple times and working the zipper back and forth. It's never stuck, it just takes an astonishing amount of effort and makes a larger than expected amount of noise. I've come to the conclusion that perhaps the slider is the culprit rather than the teeth. Haven't had the time to really mess with it much since.
 |
| You can see the beeswax is kind of caked in there now. Not an attractive solution! |
It made the zipper zip slightly less loudly and slightly more smoothly, but when I tried it again a day later it had returned to the original state. *sigh*
ETA: I've just checked the remainder of the zippers and found two or so that are going back for ones that are less loud and more smooth!
ETA: I've just checked the remainder of the zippers and found two or so that are going back for ones that are less loud and more smooth!
Thursday, December 9, 2010
Felted No Sew Zipper Bags
Following the 3rd installment of TECHKnitter's A little felted purse KAL (part 1, part 2) I attempted to hand felt the bags. Now I can't figure out if that was yesterday or the day before - it was the day before, or rather the night before. They were drying all day today (well technically it's been tomorrow for almost 2 hours already, but since I haven't slept it's still "today.")
I've never been keen on rubber dishwashing gloves, but the ones I could borrow were about a size too big. I don't know if this added any potential extra friction, I did notice it especially annoyed me around my thumb. Or maybe it's just the shape of the gloves. They fit better with your thumb bent across the palm, as if grasping a plate. Since I was using them with flat hands that made them feel gappy and weird. Oh, well!
I think in places I overfelted and other places underfelted. I tried to draw as much extra water out of the bags by rolling them in towels. I'd left the bags on their side for several hours earlier today under a ceiling fan so the bottoms could get dry more quickly. There is still dampness under the little pockets that were made by folding and tacking the bottom.
Isn't the little bag cute?
It's about 4" wide at the base and about 5" wide in the middle and at the top trim. This bag is 3.5" high and 2.75" deep across short direction of the base.

Bottoms up! I wasn't sure just how the shaping on the bottom was supposed to go, but this seemed reasonable to me. I probably should have felted the bottom a little more so the seam would disappear.

This is the big one, of course. At first I'd stuffed it with plastic bags and left the sides straight. Early this morning I decided one of the really appealing things about the bag pattern model was the rounded sides. So I stuffed in a few more bags and readjusted everything. Too bad my hands are concealing that detail. I would have liked for it to have the same curve as the small bag. But this is my compromise for now.

At least the shape is easier to see in this photo. Perhaps the pattern in cognac heather and plum heather, too (the upper stranded pattern). I used the chart from Latvian Fingerless Mitts by Veronik Avery in Knitting Classic Style: 35 Modern Designs Inspired by Fashion's Archives. Except I started the top intarsia band at the bottom of its portion which makes it upside down since the bag was knit from the top down. The lower, more eye-catching band is the same right side up and upside down.
I really feel like if I'd been planning rather than making it up as I went along I would have positioned the dramatic colored band higher, or near the top. And I probably would have chosen less similar colors for the subdued pattern band to make it stand out more. I don't know why I still have such a weakness for pairing cognac heather with plum heather. The order makes more sense if I'd worked all of the body of the bag in reverse, starting with the jade that's on the bottom and ending with cognac heather, the solid band near the top. Just noticed how terribly difficult it is to see the top trim. I think the color is called dark teal heather. It's a nice dark green. Bag measures 5.5" across the long side of the base, 4.75" in the shorter direction and 6" across where it zips closed. Width is about 6.5" and it's about 6" high including the top edge of the green trim.

This was supposed to be attached to a zipper pull for the smaller bag, but some time after taking the second pic it must have fallen out of my hand and I haven't found it yet.
I've never been keen on rubber dishwashing gloves, but the ones I could borrow were about a size too big. I don't know if this added any potential extra friction, I did notice it especially annoyed me around my thumb. Or maybe it's just the shape of the gloves. They fit better with your thumb bent across the palm, as if grasping a plate. Since I was using them with flat hands that made them feel gappy and weird. Oh, well!
I think in places I overfelted and other places underfelted. I tried to draw as much extra water out of the bags by rolling them in towels. I'd left the bags on their side for several hours earlier today under a ceiling fan so the bottoms could get dry more quickly. There is still dampness under the little pockets that were made by folding and tacking the bottom.

Isn't the little bag cute?
It's about 4" wide at the base and about 5" wide in the middle and at the top trim. This bag is 3.5" high and 2.75" deep across short direction of the base.

Bottoms up! I wasn't sure just how the shaping on the bottom was supposed to go, but this seemed reasonable to me. I probably should have felted the bottom a little more so the seam would disappear.

This is the big one, of course. At first I'd stuffed it with plastic bags and left the sides straight. Early this morning I decided one of the really appealing things about the bag pattern model was the rounded sides. So I stuffed in a few more bags and readjusted everything. Too bad my hands are concealing that detail. I would have liked for it to have the same curve as the small bag. But this is my compromise for now.

At least the shape is easier to see in this photo. Perhaps the pattern in cognac heather and plum heather, too (the upper stranded pattern). I used the chart from Latvian Fingerless Mitts by Veronik Avery in Knitting Classic Style: 35 Modern Designs Inspired by Fashion's Archives. Except I started the top intarsia band at the bottom of its portion which makes it upside down since the bag was knit from the top down. The lower, more eye-catching band is the same right side up and upside down.
I really feel like if I'd been planning rather than making it up as I went along I would have positioned the dramatic colored band higher, or near the top. And I probably would have chosen less similar colors for the subdued pattern band to make it stand out more. I don't know why I still have such a weakness for pairing cognac heather with plum heather. The order makes more sense if I'd worked all of the body of the bag in reverse, starting with the jade that's on the bottom and ending with cognac heather, the solid band near the top. Just noticed how terribly difficult it is to see the top trim. I think the color is called dark teal heather. It's a nice dark green. Bag measures 5.5" across the long side of the base, 4.75" in the shorter direction and 6" across where it zips closed. Width is about 6.5" and it's about 6" high including the top edge of the green trim.

 |
| Sure looks like it's just about to roll off and never be found! |
This was supposed to be attached to a zipper pull for the smaller bag, but some time after taking the second pic it must have fallen out of my hand and I haven't found it yet.
Monday, December 6, 2010
No sew zipper bags
Following along with TECHKnitter's A little felted purse KAL (part 1, part 2), earlier today I was delighted to find the the final installment posted. It covers flattening the bottom of the bag, felting by hand and making a zipper pull. In the meantime, I'd started a second bag. I improvised upsizing the bag for version 2 because I realized I'd rather be able to put my whole hand inside. From there I just kept making it up as I went along.
 There were some big blunders, and a few decisions that could have been better, but it's been a lot of fun. I started off using the wrong dark green zipper and didn't realize that until I was 3/4 done with binding off the top trim. That zipper was an even less ideal match than the one used here..
Because of my camera situation I am reduced to whatever pictures I can manage to take with the computer.
Actually, the color in these is pretty good. It'd be nice to have less hands and a more interesting background, though.

I'm still working on knitting the bottom of the second, larger bag and haven't yet felted the first bag. I just wanted to stop here and put some time in on a project that is a gift for someone else. I had a thought that these could make cute gifts, but I'd have to put some planning into the colors and possible designs. So far my commitment to the project has just been to buy zippers that match yarn I'm willing to use for the trim at the top and planned to use up some of my supply of wool on hand. Which mostly means only colors that I'd pick and not colors that really appeal to or reflect family and friends. It could be especially nice to make sets of nested bags, but then there's additional thinking and figuring and also multiplying the work by about three times.
The project I stopped for would be Santa Claus and the Mrs. I have to take long breaks from it because I'm using a small hook and working tightly, which really tends to wear on my hands. Oh, my! I just realized that I didn't take and pics yet of Santa's hat. It's not quite finished, but there's enough of it to be worth a glimpse anyway.
I'm thinking perhaps it was a bad idea to work a stranded pattern in something I'm going to felt lightly. Of course, strands on the inside are going to be great for snagging so that sort of demands a lining now. oh well! Besides that, I could have done a better job of arranging where I was putting the designs on the bag. It just didn't occur to me to put a stranded color pattern on the bag until I got to the teal striped (working downward from the top). The two colors in the hard to see pattern are ones that I love together, but they are not very distinct in such a small pattern. Actually, the color work is the chart from Latvian Fingerless Mitts by Veronik Avery in Knitting Classic Style: 35 Modern Designs Inspired by Fashion's Archives.


The smaller, original bag has a bottom and only needs felting and the zipper pull. I realized after completing the knitting and starting the body of the 2nd bag that I'd misunderstood the instructions. Instead of having 19 rows total, including the stripe, I had 19 rows after the stripe. I'll always find a way to do something wrong.
Friday, December 3, 2010
More progress - No sew zipper KAL bag
This is my progress so far on A little felted purse KAL.
Past my bedtime, but I'm kind of excited about the pictures, so I'll share those at least.
 Working the 3 needle bind off, but using one hand to hold the camera ;o). Turned half inside out, this is the best color representation of them all.
You can see my KoalaCaddie there too. Been meaning for a long time to do a lot of typing about how wonderful it is and how much I love it. Isn't it pretty?!
ETA: just realized I goofed following instructions. Think I was supposed to only have 15 rows after the color change for a total of 19. I worked 19 in the bottom color, though. oh well!
Thanks, TECHKnitter!
Past my bedtime, but I'm kind of excited about the pictures, so I'll share those at least.

You can see my KoalaCaddie there too. Been meaning for a long time to do a lot of typing about how wonderful it is and how much I love it. Isn't it pretty?!
ETA: just realized I goofed following instructions. Think I was supposed to only have 15 rows after the color change for a total of 19. I worked 19 in the bottom color, though. oh well!
 |
3 Needle bind off done. |
 |
| Right side up |
 |
| Up side down |
 |
| See why I need to adjust the tension in the superwash pick up row? |
Thanks, TECHKnitter!
Tuesday, November 30, 2010
Hurray for zippered bags!
Today I was delighted to see that the KAL for TECHKnitter's little felted purse had been posted. Or rather part one is posted. I went searching for superwash yarn that would coordinate with the zippers I had leftover from the KnitPicks Elegant Edibles kit. For the kit bags I bought zippers that matched the yarn used rather than using the standard taupe color that came in the kit.
I'm realizing now I have a lot more feltable wool than superwash. AND when I went searching for my lost Knit Picker I found that I had a whole roll of do it yourself zippers. Don't remember how many yards are in that, but it seems there are about a dozen zipper pulls that came with it. That zipper tape/coil is beige or cream, so I'm hoping it will coordinate ok enough with a few other yarns that I can go ahead and start another one or two while I'm waiting for the next part of the pattern to be revealed. I have to wonder if some other non-feltable yarn would work out ok for the top instead. I have plenty of cotton and acrylic lately.

I didn't work in the tails yet, because I'd kind of like to see what's coming next first and also be sure that the way I bound off the top edge and the way it's rolling in really is what's intended.

It sure looks like it's sewn on with yarn from the reverse side. But those loops are picked up through the zipper and knitted on from there. As if by magic!
 |
| The zipper is a good bit lighter than this yarn, but it's not the harsh difference it seems here. |

I didn't work in the tails yet, because I'd kind of like to see what's coming next first and also be sure that the way I bound off the top edge and the way it's rolling in really is what's intended.

It sure looks like it's sewn on with yarn from the reverse side. But those loops are picked up through the zipper and knitted on from there. As if by magic!
And finally, the squares before the last square (for now)

Darn! I already posted a snapshot of the Blue Chrysanthemum. Surely it's lovely enough to look at twice ;o). Don't remember if I mentioned here or in my notebook that I never imagined working a decrease upside down to make upside down triangles, as the purple ones around the border. (At least that's how I recall it; looking back at notebook it was a 3hdc cluster...) And my crochet experience is fairly limited.
Besides the patchwork (last square) this is another square I'd consider making enough of to make an afghan, or maybe just a lapghan. That I'd consider it at all is very complimentary indeed! (Perhaps the illusion star blanket as well...)

Kinda camouflaged, which had run out of sage green earlier, is done now. The pattern is a sample block #4 from Melinda Miller's Sensational Sampler Afghan/Lapghan.


Above is sample block #1 from the same Sensational Sampler. It kind of reminds me of atari game backgrounds. I think it would work equally well turned on it's side, too, so it seemed like a good idea to take a second sideways picture of it.
 This is the Hugs N Kisses 12" square by Aurora Suominen. I really enjoyed crocheting this, learning the popcorn stitch, back cross stitch, and front post dc and fptc. Those sure add dimension! I don't understand why this photo appears so much closer to the true color in my photo program than when uploaded and viewed in the browser. It is a lovely and sophisticated blue and not the faded dishwater version it appears to be wherever I post it online.
 For that matter, the light blue in the atari blocks (a single square) above is really a dusty/country blue, not a clear and icy cyan. The lighter purple in that square always looks sickly; it's as anti-photogenic as I am!
Oooh - next are the checkerboards, one blue/green and the other berry colored (violets, or technically orchids).


The pattern, Checkerboard Illusion Tutorial by Susan Mrenna, works just fine, but if I were to do it again, I think I would enlarge the design. It seems it would be amazing with bigger squares. Actually her pattern is exceptionally well written and thoroughly enjoyable to follow, not just telling you what to do, but why and pointing out how and when you can first really see the illusion. I do not mean to sound unenthusiastic about it. I think it's the nature of squares. They are not the most dynamic of shapes, compared to say stars or tulips. I should have recalculated it to make bigger squares in the checkerboard. In the 8" square that the pattern makes the checks seem appropriately sized.
And so the berry colored version, right side up and upside down:

 With this square I crocheted the border, mostly for expediency. Crochet is just so much faster under many circumstances. Hmmm, only now realizing up til these all the squares on this page were crocheted!
Monday, October 4, 2010
Easy & Cheap Upcycled DIY Yarn Swift
Instructions for Tilta Swift at webeccasays.blogspot.com
This baby is every bit as great as my bead spinner, and the only thing I had to buy was the box, which cost me a few dollars at Staples. The box is a 5 or 6 inch cube and was the smallest they had at the time. Saw at Webeccasays that someone even used a huge mug instead. I inherited the lazy susan, used recovered elastic from an old garment, and everything else I just had on hand. I put small cast garden stones in the middle of the box to keep it from sliding off center when it's moving fast. I know there's some rubbery shelf liner around here somewhere, but the weight seems to work just fine. I position the clothespins above the yarn because for winding I sit in my recliner and put the swift where my feet should be. The yarn has a tendency to occasionally pop over the top, but never wants to slide off the bottom. A bit of the outcome depends on the sticky/grippiness of the yarn itself and how neatly or less neatly the hank was wound.
Was just a small challenge and a bit of practice to figure out how to adjust the yarn for easiest use. Like being sure one end of the yarn came neatly off the outside of the hank (as arranged around the swift) and the other end tended to fall to the inside. I have the best luck when turning the swift clockwise with the yarn approaching the ball winder around the 5:30 position. Also results are better when I keep the wire guide for the ball winder aimed toward where the yarn is coming from. Sounds like common sense, but I made some odd mistakes at first and had inconsistent results until I relaxed about it and was paying better attention.
Subscribe to:
Posts (Atom)